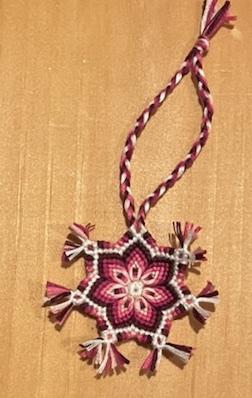
(( Projects )) Mandalas Flower
You need
-String:
- 7 strings for the base, each about 50 cm
- 28 strings (or more for a bigger mandala )for the leaves, each about 50 cm. 4 different colors are used in this tutorial: 7 times 4.
- glue
The tutorial
Step 1
Cut 7 strings of the same size (about 50cm). Take one and fold it in half as shown in image.
Step 2
Use 2 pins or clips or pieces of tape to secure the string horizontally.

Step 3
Add one of the strings that was cut before and knot it on to the first one using the larks head knot.
Step 4
Then add the rest of the strings the same way until it is like in the image. You should now have twelve strings hanging from the first thread (six lots of two).
Step 5 and 6
Take the two ends of the first string we used. The one with all the strings tied on to it. Thread the two loose strings through the loop at the other end. Pull it tight until it forms a circle.
Step 7
Take a string of another color, in this case red. Knot it onto two of the string-ends that are sticking out of the circle. A regular f-knot, or even a half hitch will do.
Step 8
Proceed with more strings. You can add as many as you like, the more you add the bigger the flower becomes.
Step 9 and 10
Knot the 'base'-strings together. (Burgundy in this case)
Step 11 and 12
Take the most right string and pass above the other strings, make a backward knot onto the right side 'base'-string ( burgundy).
Take the most left string and make forward knots onto the left side 'base'-string(burgundy) and onto the one you knotted with in the previous step, which is the red in this case.

Step 13 and 14
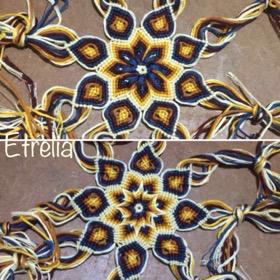
Proceed with the other strings (picture 13) and than go to the next pair of 'base'-strings (picture 14) till you have 7 leaves.

Step 15
Now connect the leaves by knotting the outside strings of each leaf together, and knot these all the way to the top of the leaves. ( Burgundy in this case. )

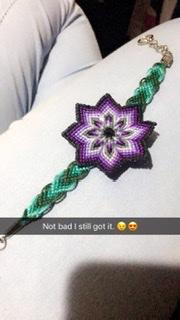
The remaining strings can simply be cut and burned, or glued to the back in case you used floss or yarn.
Another possibility:If you are gluing the floss to the back, braid each section (14 braids total) and then fold the braid over and glue it down one at a time, and then trim the excess ends off.
Variation to make a larger flower
You can add another layer to the flower as shown in the tutorial for the pouch
Or you can simply add more strings to the leaves in step 8.
Videos
http://www.youtube.com/watch?v=d6aVSagSIQw
http://www.youtube.com/watch?v=v7KGpjudXAI&feature=related
Editors
The original author of this tutorial is nesdi but it was also edited by Geyn, Stefan, Sareana, ririttt, k_marie, kleinevos, Becci, Allison98 and Tyttoo.
Uploaded photos (see all 436)
Comments