(( Bracelets )) 3D Shaped Zig Zag
Introduction
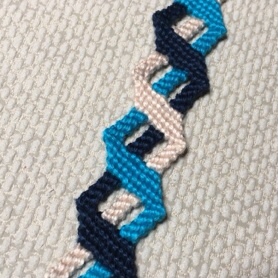
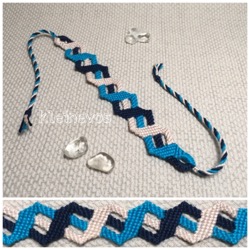
So here is the original prototype made by Kamyk (The one at the extreme bottom) :https://www.friendship-bracelets.net/gallery.php?id=49128 .
_____________________________________________________________________
3D Shaped Zig Zag
Materials
-Colours:3 different colors according to your preference.
-Strings:12 working strings, i.e. 4 strings per colour
-Length:Cut approximately 60 to 65 inches or longer depending on your wrist size. To be on the safer side, stick to longer strings because they're much easier to work with. But don't cut them too long, that'd just be a waste of string.
_____________________________________________________________________
For this bracelet I will be using the colours blue, teal, and cream.
You can start your bracelet however you want to.
______________________________________________________________________
Step by Step
Step 1
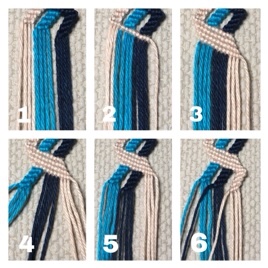
Set Your strings up like shown (1) into 3 different groups.
Note that the picture already shows bars, but don?t let that distract you ;-) The start is the same as making the division after the bars.
Step 2
Start off with your left most colour, which is cream for me. Take your left most string of the cream colour and make forward knots onto the remaining strings going to the right.(2)
Step 3
Pick up your next string in line which is the 2nd string of the cream colour (that is now your left most string) and do the same as the previous step. Repeat with all cream strings.(3)
Now set your strings straight again and divide into three colored groups again
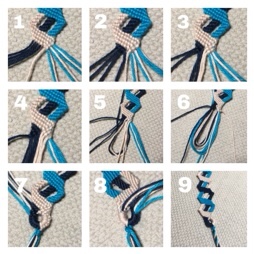
Step 4 (Bars)
Now we are going to work on the bars.
We are going to work with the teal first.
Take the right most string of the teal colour and make 3 backward knots onto the remaining teal strings.
Repeat this 3 more times with the same colour (4)
Step 5
Time to work on the blue colour.
Make 4 rows of backward knots. (5)
Step 6
And finally time to work on the cream again. Do 4 rows of backward knots.
The bars are now completed. (6)
Step 1,2,3 again
Time to work on the next division. This is a repeat of steps 1,2,3.
Take your far left string, which is the teal for me, and make forward knots onto all remaining strings. Repeat with all teal strings.
Step 4,5,6 again
Now after doing the division part, you're going to repeat step 4,5,6 again, by making the bars.
Keep repeating from step 1 until you reach the desired length.
Closure
Now when you are satisfied with the length of your bracelet and want to finally end your bracelet, you can end it however you like.
One possibility is finishing with loops and braids on both sides:
First thing to do is finish in a v-shape, by ending each row of the last division one knot earlier:

Then you can start the rest of the finishing touch:
(Or end it here and make braids.)
Take the most right string, one out off the two, and make 3 backward knots. Each knot around more than one string. The first knot around 3 strings, the next two knots around two strings.
Take the most left string and make 3 forward knots. Each knot around one string.
Repeat, making two knots instead of 3.
Repeat, making one knot.
Knot the two middle strings together, fold these strings, forming a loop.
Take the next middle strings and knot these around the looped strings.
Fold and loop these strings too.
Repeat with the last middle strings. Do not loop these.
Repeat one more time: Fold two of the cream strings over. Knot around all strings with the remaining blue and teal string on both sides. You should have 6 strings left for the braids. If you want more strings, skip one or two times looping strings. Make a few more knots to finish the loop.
Pull the looped strings tight. You can cut these strings after that.
This is the backside before cutting strings and making braids.
Loop finished!
_________________________________________________________________________
__________________________________________________________________________
And that's all there is to the bracelet. I hope the tutorial was clear enough and that you enjoyed it too ;)
Cheers & Have a Great day!
Editors
The original author of this tutorial is usr58785 but it was also edited by Foz, Kestrel, ririttt, Alicat, EmmaLiz44, chanisarak, piggyfan2, kleinevos, DogsAreCool2325, KnotterHolic and abir.
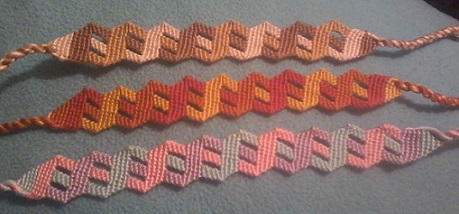
Uploaded photos (see all 140)
Comments