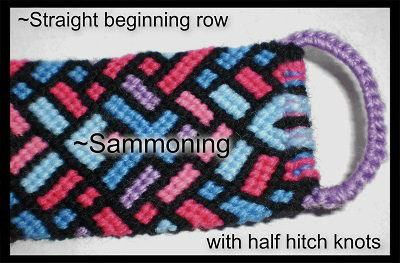
(( How to... )) Make a Straight Beginning Row
| Table of contents |
|---|
| 1 - A small bracelet 2 - A large bracelet 3 - Two buckles 4 - Pattern without a "chevron" beginning 5 - How to make a straight start for a candystripe pattern |
as requested by Melancholy :-)
One quick and easy way to make an even, straight line at the very beginning of any bracelet would be, of course, to cut single threads and tape them down in the correct order. But it works just as nicely when you're starting with a buckle - and the first step, naturally, is to make the buckle. The tutorial can be found here: https://www.friendship-bracelets.net/tutorial.php?id=370
Depending on how many threads your bracelet has, you'll want to create a bigger/wider buckle. For any pattern with more than 40 threads it would be a wise move to make two buckles.
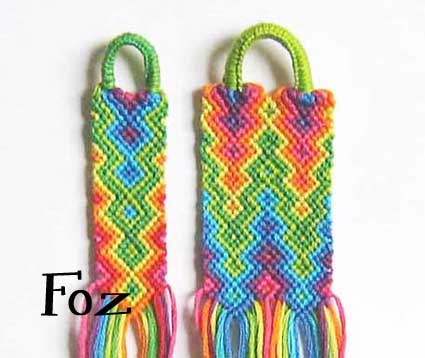
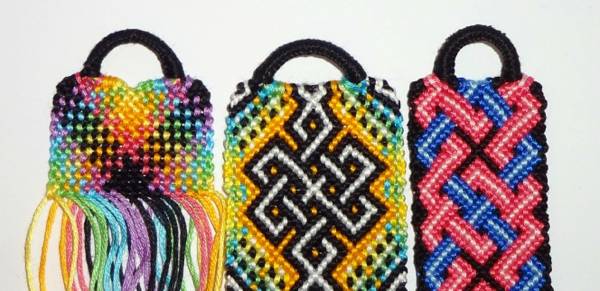
A small bracelet
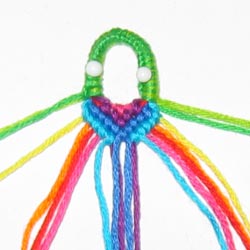
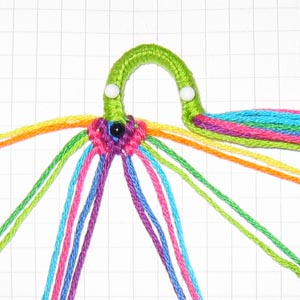
I've chosen to make #3649, which has 18 threads. When it's done it will be 1.8 cm wide, or 0.7 in - so the buckle needs to be no longer than 3 cm (1.2 in) and I'll fold it so it forms a fairly narrow loop.
To make sure the starting row not only gives the knotted part an even beginning, but to also ensure that the buckle stays centred, I like starting with the middle knot. I've created some extra order and fanned out the threads, and organised them into groups of two, according to the thread order supplied by the pattern.
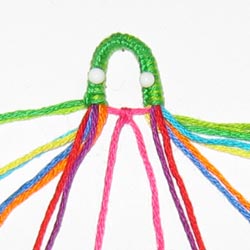
The first knot can look a little wonky, but those loose looking threads will even out as soon as more knots are added to either side. So, moving out from the centre, we'll take the adjacent pairs to make one knot on either side of the middle one.
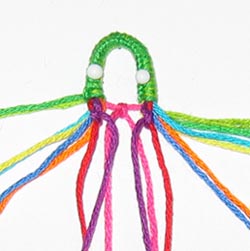
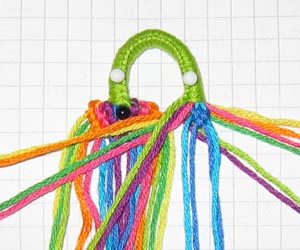
It's still looking a little loose and messy right now, but this is about to change ;-) Since the pattern starts off with a chevron, I'll keep going with those threads I just used, until I reach the centre.
I'll do the same for the next thread - since the threads aren't exactly in the proper order, make very careful knots. The very first one often turns out a tad loose, but as of the second knot you can carefully establish nice, even tension. Just go slow and don't pull too tightly, and knot all the way down to the centre. Repeat on the other side.

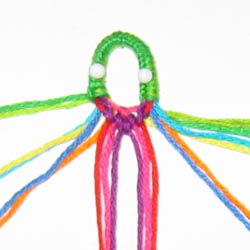
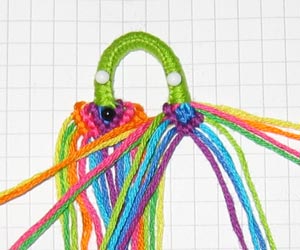
That doesn't look half bad ;-) If it looks like it's turning out a bit uneven, or a bit off-centre, give the threads a gentle little tug to smooth things out. This is another reason you don't want to make super tight knots, because you've left yourself some room for gentle tweaking :-)
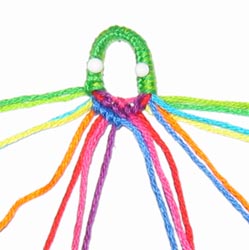
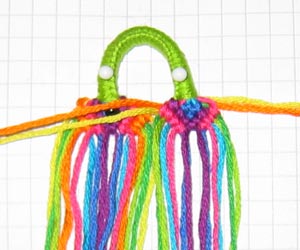
Repeat this with the remaining two pairs on either sides - a careful, loose knot over the first thread to not create any unnecessary strain, and even knots towards the centre. Done!

A large bracelet
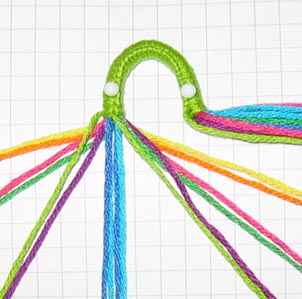
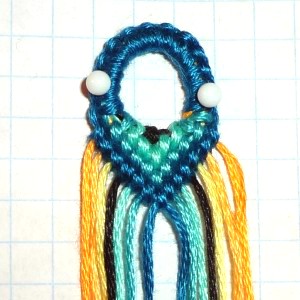
If you're making a bigger pattern, the approach is pretty much the same, but you'll have to allow for a wider buckle to have room for all the threads. I chose #7580, which has 32 threads and measures approx. 3 cm (1.2 in).
Because there are so many threads, the loop will have to extend a bit wider than with the previous bracelet, and I'll make the buckle at least 3.5 cm (1.4 in) long. When pinning it down, make sure it spans about 2 cm (0.8 in). With a bracelet this size I'll cheat a little and pin it on graph paper so I can make REALLY sure it's even all the way :-)
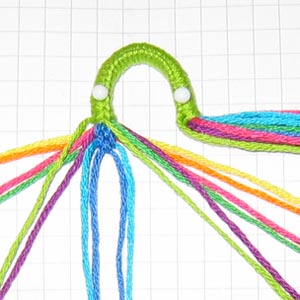
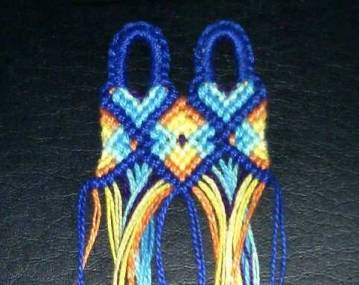
The pattern I've chosen is made up of two separate chevrons, and uses the same number of colours and threads on both sides. So I'll start on one side of the pattern, and leave the other side for later.
I've spread out the threads in the order I'll be using them, so they're as untangled as they can be, coming from inside the buckle.
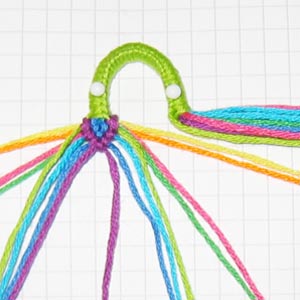
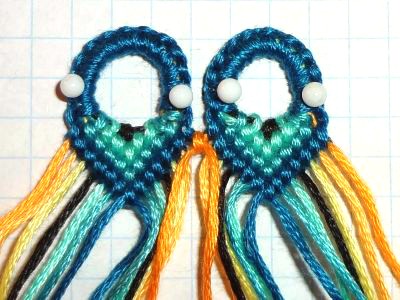
I'll start at the centre again; in this case the centre isn't only one knot, but a mini-chevron of three knots. The other threads seem to be in the way (what's the light green doing there, hanging over like that?) but that's only temporary :-)
Moving on to the next pair of threads, I'll make a very careful knot - if I pull too tightly that will just put extra strain on the other threads. Note how the purple on the right side had to go OVER the dark green, and use the light green that seemed to be at a very awkward position. By making a very gentle, and rather loose knot, I've avoided the whole thing buckling in on itself.
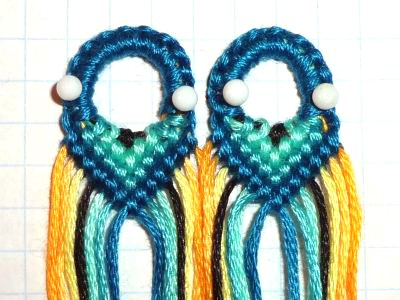
I'll repeat the process for the remaining two pairs, paying extra attention to the very first knots. By keeping those fairly loose you'll automatically be creating a horizontal line. (I've pinned down the centre to keep it from moving, in case anyone's wondering what that extra pin's doing there.)

The left side is done, so I'll basically do the same thing on the right side. If anything, the threads seem to be in an even bigger mess than they were on the left - light green once again is not very co-operative, and this time purples's joining in the fun as well.
But I'll be starting in the centre anyway, and once again I'll be making that small chevron consisting of three careful knots.
Using the rebellious light green and purple, I'll have to be even more careful than usual. Because the threads were in such weird positions this doesn't look nearly as neat as the left side did...
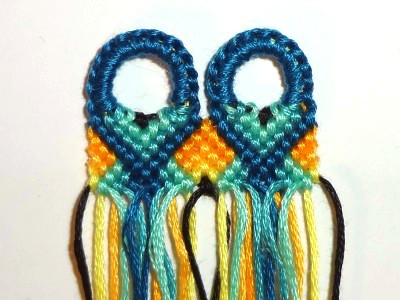
Moving on to the next pair, it's time to fix what purple tried to mess up. Note how the first purple knot on the right is slanting down and trying to ruin my horizontal line? By making the first knot with the pink just that tad looser, we're on the way of fixing that.
By the time I'm onto the final pair, we're back where we want to be - in a nice, horizontal line. Now all that's left to do is to join both sides up :-)
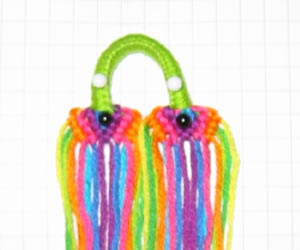

Two buckles
If you don't like starting with one big buckle, you can, of course, make two :-)
Go about choosing your pattern like you would if you were making one buckle, but consider one more thing: Make sure there are at least two of each colour on either side of the pattern.
Here are a few examples, just in case this makes no sense:
Pattern #888 has 24 threads, consisting of two identical sides of 12 threads. So it's not only symmetrical, but as far as the threads are concerned, it's doubled side by side (two patterns #28 actually!), and ideal for two buckles.
The same holds true for pattern #54887: both sides are identical, and there are at least two of each colour on both sides.
See Allkoo's photo. here
However, #48334 would be a lot easier to make with just one buckle. It's symmetrical, but the threads differ on both sides of the pattern. So if you were to half it to make two buckles, you'd end up with single threads for C, D, and E.
Alrightie, enough talk.
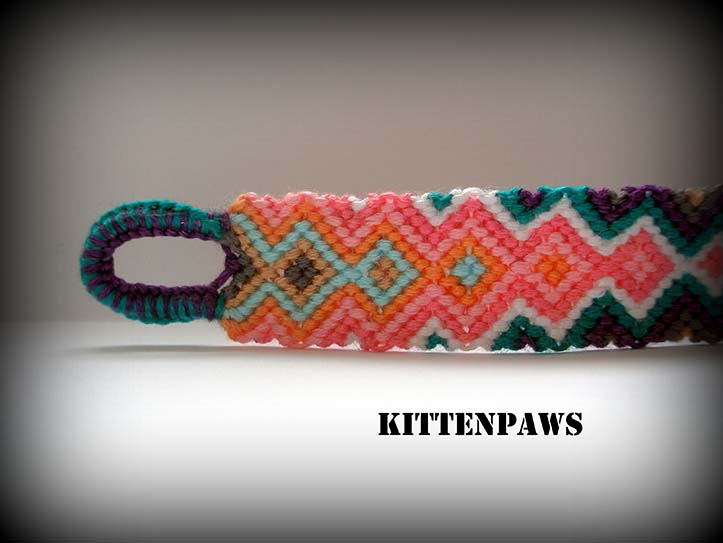
I'm making Arismende's gorgeous pattern #53249, which has 28 threads, consisting of two identical sides with 14 threads.
For a change I made a different buckle, just to try something new. The tutorial I used can be found here
Make the buckle for one half of the pattern, and follow the instructions from this tutorial to make a straight beginning.
Make the buckle on the other half of the pattern, and pin it next to the first. Start knotting this side of the pattern the same way you did on the left side.
Quick tension check! If you intially pinned the two buckles too far apart, or too close together, just shift one of them so both sides connect smoothly. A gap would cause the knots in the middle of the pattern to stretch and look loose, and if the buckles are too close together the knots will be fighting for room and make the centre look too tight, and make the pattern look uneven :-)
If you're happy with the position of your buckles, all you have to do now is connect the two sides. In this case all it takes is one little orange knot:
There, that's all there is to it :-)
Keep knotting, and when you're done, just finish off with two braids for each buckle for easier tying.
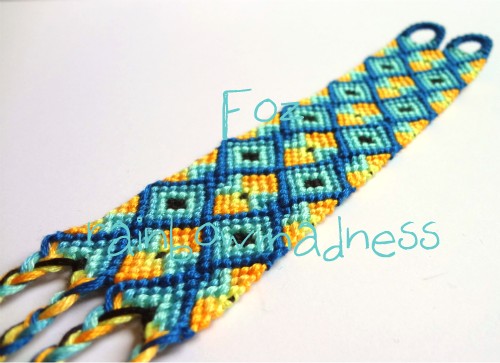
Done!
Pattern without a "chevron" beginning
If you want to make a bracelet with a straight beginning row, but the pattern does not start with a chevron, you might find the earlier parts of this tutorial a tad unhelpful.
If the pattern uses too many threads for one neat buckle, but cannot be halved and made with two buckles, the aforementioned approach might also be too simple.
To keep the beginning all nice and tidy, and to avoid threads reaching all over the place, we'll just stick with one buckle, and divide the threads into those that go on the "inside" part of the buckle, and those threads that will be on the "outside"
I'm making #42640, and I've already made the beginning on the left side. The six threads on the outside of the pattern will be on the outside of the buckle, and the middle ones will be on the inside.
Take the four A's, one B, and one C, and pull them to the side. Then we'll start with the inside part, and with the knot that is furthermost from the centre, which is a forward knot with C over B. Take B and pull it out of the bundle of threads, and wrap C from the back towards the front of the rest of the threads. Place those threads to the side -- this is basically how we'll be working in a horizontal line, by wrapping the working threads around those that will be used later. Then make a forward knot with C over B.
The next one is a forward knot with E over D, and the same rules apply. Take out D, wrap E around all the threads you're not currently using, and make a knot. The next one is another forward knot with E over D, and a forward knot with both G's over the F's. I've pinned down the very centre to keep the row straight, but they will stay like this as soon as we join up the centre.
However, we'll finish the outside part first. For the forward knot with C over B we'll take B from the bundle, and pull the remaining A's to the right. Wrap C over those A's and knot over B. Because we're starting from the right, you'll be making a backward forward knot, so that the threads end up in the right position.
Take one of the A's from the bundle, place it aside, wrap another around the remaining two, and make a knot. Then make the final knot with A over A.

Join up the centre and you're done.
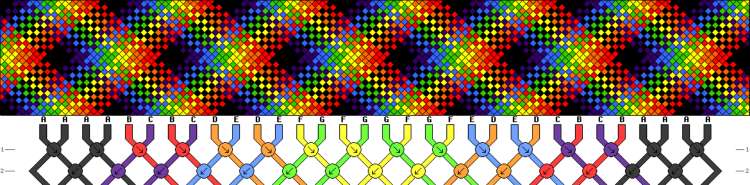
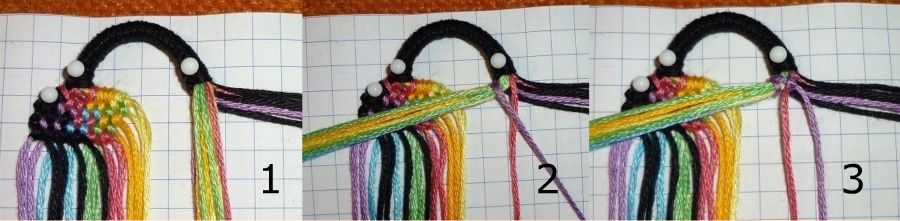
How to make a straight start for a candystripe pattern
Pattern:


Both sides have different colors, so some strings are not fold in half, but have one short and one long end.
Make larkshead knots around the strings, the single colors are also inside the knots.
The short ends of the single colors can be cut of after the bracelet is finished. If all colors are single, it might be a good idea to let some strings run in a circle/ make another round through the larkshead knots to secure the buckle.
(The left side is already started here, knots are made from left to right.)
Right side: First knot is a black knot, on the outermost right side. Note that the straight start will only be made to the middle in this case, not sticking out to the sides, because this is a fairly small bracelet.
First knot: Take a black string and make a knot around the green string (and around an extra string in this case: A black borderstring. If you don?t add borderstrings you can ignore this.) Both strings need to be pulled to the front first so the remaining strings will not be visible.

5,6
Second knot: Next knot is a yellow knot, around a black string. Take the yellow from behind and over the remaining strings to make the knot around a black string.
Third knot is black knot again, around a blue string. Again, take the black string from behind and over to make the knot.
Connecting: The first row of both sides are made, the sides can be connected now. The connecting knot is the middle knot in the next row of the pattern.
This is how the finished start looks like:
-I would personally recommend making knots instead of only taking the string from behind and over. I think that will make a cleaner start.

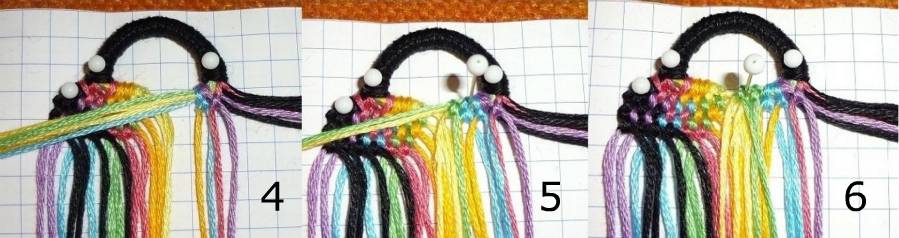
Alternative way, also for alphas :

* Note:
-for normal bracelets: use one half hitch knot for every string. You might need to do two for some of the strings to make the first row as wide as the bracelet will be.
-for alphas: use two half hitch knots for every string

1.Take all of your strings, but 2. Leave out the outermost strings and the innermost string of the pattern you want to knot.
Make a larkshead knot around them all with that innermost string, in the middle of the strings.
2. Take the color you need next and knot a half hitch knot ( two for alphas ) around the rest of the bundle of strings. A half hitch knot is half of a regular knot, backside up in this case.
3 and 4. Proceed with the next colors, each time leaving out the previous used strings.
Do the same at the other side.
Fold the strings you've not yet used (yellow in the picture) round, like a buckle, to the opposite side
7 and 8. Make larkshead knots around these (yellow) strings with the outermost strings of the pattern.
9. Pull the yellow strings untill it's the right size to start knotting the bracelet.
WIDER BRACELETS:

10 and 11. Make the larksheadknots around the yellow strings and the strings you need next in your pattern.
12. (Left side is already finished in the picture.) Make one half hitch knot with the yellow strings around the strings within the buckle, and two half hitch knots around all of the strings that come out of the larkshead knots. There might be a nicer way to hide the other strings, but this is how I did it this time.
13. Take the next string and knot it around all of the strings next to the yellow string.
Proceed with the remaining strings.
You can now start the knotting! :-)
Editors
The original author of this tutorial is Foz but it was also edited by ririttt, k_marie and kleinevos.
Uploaded photos (see all 5)
Comments