(( How to... )) Straight Start & Natural Loom for Large Bracelets
Something I came up with after finding an overhand knot with a loop to be way too bulky for larger bracelets. Great for alphas, adjusts to accommodate lots of threads and stays straight for the most part. ?
If you don't know how to read patterns, check this out:
https://www.youtube.com/watch?v=1NIBj64NUXw
Take note of the very first (or) very last strand of the pattern. You'll want to use this color as your longer thread utilized in wrapping the main loop as well as the quick start alpha row in the pattern.
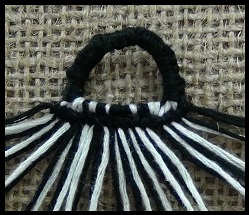
The gist of this is to take the outer strands (according to your pattern) and choose about 6-9 of them to gather for the loop. After you form the loop and fk/bk and then bk/fk repeatedly to get it covered you pull out one single thread from the gathered threads on either side (just like a hair wrap) and then pull them to the center to cross.
You'll now be lashing the crossed strands together - it's sort of like the adjustable bracelet closure but you'll be doing a single larks head knot (also known by cow hitch and a bunch of other names) in order to lash together the crossed threads in the middle.
Larks Head:
https://www.youtube.com/watch?v=WyzUmetVJFA
Do this for all of your threads keeping them in similar order of your pattern. Odd strands in colored patterns can simply be tied on overhand style and made more secure by tucking under some of the larks heads.
The awesome part about using the larks head knots is that they essentially "float" on the crossed strands so once you finish up adding the center threads for the bulk of your bracelet you can simply tug either side of the crossed threads and it will condense to the exact size of the pattern.
Now for the "Knotted Loom" explanation...
I then take the same (longer) thread I used to do the wrapping and make a single row of alpha knots across all of my strands. If your wrap strand is on the left, follow the pattern from the left. If your wrap strand is on the right, follow the pattern from the right.
Redundant link to pattern reading is redundant:
https://www.youtube.com/watch?v=1NIBj64NUXw
Since this is a 1212 pattern we will be knotting the base strands in pairs to simulate the actual pattern outcome which has two threads coming out of a single knot. The alpha row will be made over the pairs of threads in the order they appear in the pattern.
NOTE: For actual alpha bracelets make sure to only knot on a single base thread instead of pairing them up- you can pair them if you want a larger knot outcome but it's not necessary.
The length of thread will depend on your bracelet. I generally use 65 inches for anything 15 strands or less as a rule of thumb. Once we get to 20-25 I bump up to 70-75 and 30+ requires a little more yet around maybe 80ish. The pattern in the video is 34 strands and I used 6 feet of string (72 inches) and it's getting a bit short to finish... so 80 may be best.
If you are paranoid of wasting strands you should practice on some scraps or colors you never use prior to doing this to your good thread. It will take some practice but once you do it a few times it should seem pretty intuitive if you aren't as dense as I am. Hah... =P
Good luck and thanks so much for watching. ♥
Editors
The original author of this tutorial is BeyondBracelets but it was also edited by .


Comments