(( Patterns )) Multi-Colored Rainbow Equality A10355 - Getting started
Let's jump right in shall we?! *NOTE: You may find several tips that can be used on any other multi-colored alpha!
Here we see your base starting strings. Black, purple, purple, blue, blue, green, green, yellow, yellow, orange, orange, red, red, and black. I find it best to tape all the strings to my clipboard, that way they didn't bunch up on me, or get crooked.
Now, get your background string ready!
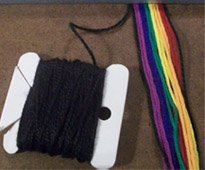
I suggest putting your black background string on a bobbin. This makes it far less likely to tangle. A plastic bobbin is best, I learned from experience that cardboard ones fall apart long before you are finished. (You will need at least 1 whole skein for this pattern.)
First Knot!!
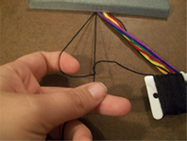
If you are starting on the left, and headed to the right, that means you must do Forward Knots. The easiest way I found to remember which knot is which is, Four for Forward. Notice in the picture, I have taken the black background string, and crossed over my first black base string to create a 4. The first row will be all Forward Knots.
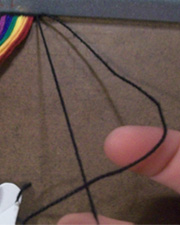
Now for the second row, we will be going backwards. Knotting from the right, to the left. This means that you will be doing Backward Knots. And of course, the best way for me to remember how to do a backward knot, is a backward 4, like seen in the above picture! All knots in this row will be Backward Knots.
I did 4 all black rows before I started the actual pattern, this helped me keep everything aligned correctly, and others may not have to do that.
[I][U]REMEMBER[/I][/U]
Tying left to right = Forward Knots
Tying right to left = Backward Knots
Always use the black background string for the border and letters!
Time for the rainbow!!
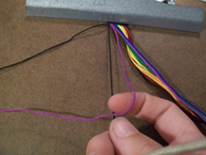
This is really easy once you know what to do.
When you are ready to add in one of the base color strings, all you have to do is knot in the opposite direction that you are headed. Remember that you need the colored string, so the colored string is "dominate" to the black one. So basically...
Headed left to right doing Forward Knots? Then do a Backward knot with the colored string over the black background string!
Headed right to left doing Backward Knots? Then do a Forward knot with the colored string over the black background string!
*NOTE: Because of the way this pattern was designed, you will almost always be doing the opposite of the general left-right = forward, and right-left = backward rule.
Editors
The original author of this tutorial is Lovemenot but it was also edited by Kel7rockstar, Stefan and k_marie.
Comments