(( Bracelets )) Double Zig-Zag
Materials and Set Up
You'll need 2 different colors of thread, 40 inches each. For the purpose of this pattern, we'll say four 40 inches blue thread and six 40 inches yellow threads.
Set Up: parted in such a way to illustrate the 5 threads that will make the left and right zig-zags.
Example: Y=Yellow, B=Blue
Step by Step
Step 1
First, you'll be working on the right zig-zag of the double zig-zag. Starting with the 5th string from right (Y), make four forward double knots.
Step 2
Do the same with the next four strings until you create a diagonal stripe with Y, B, Y, B, Y pattern.
Step 3
To create the zig-zag, create four backward knots using the rightmost string (Y).
Step 4
Do step 3 four more times with the succeeding strings to create the same Y, B, Y, B, Y pattern.
Step 5
Now, work on the left zig-zag. Take the 5th string from left and create four backward knots.
Step 6
Do step 5 four more times using the succeeding strings to create Y, B, Y, B, Y pattern.
Step 7
Create four forward knots with the leftmost string (Y).
Step 8
Repeat step 7 four more times.
Step 9
To join the left and right zig-zags, make a double knot using the two strings in the middle (5th and 6th strings).
Step 10
Repeat steps 1 through 9 until the desired length.
Step 11
Tie your bracelet and cut the remaining strings.
Video
___________________________________________________________________________
Alternate Version
INTRODUCTION
Hey Everyone. This is my Version of the double connected zig-zag braceleet and I hope you enjoy this bracelet. It's very simple and I'm sure you'll grab it real soon.
Here's the Bracelet We're Doing today:
__________________________________________________________________________
Materials and Set Up
Colors: 6 different colors (as in the tutorial) But this bracelet is totally flexible. You can use as many colors as you want. I stuck to 6 colors because I didn't want my triangle at the center to be quite large. I feel it looks a bit odd if it's too big. But your free to experiment if you like thicker bracelets.
Number of strings: You're going to need 2 strings per each of the 6 colors. So that means you'll be working with 12 different working strings :D
Length of Strings: Cut your strings about 40 to 45 inches to stay on the safe side. I work best with longer strings. Or otherwise cut accordingly depending on your wrist size.
Set them up like you would a normal chevron shown as below, 1 2 3 4 5 6 (Middle) 6 5 4 3 2 1.
Example:For this bracelet I'm using 6 different colors. Gold, Light Pink, Brown, Black, Red and Teal
You can start your bracelet however you want to. I started mine off with double braids as shown below:
Divide them into 2 equal groups/sections.
First we're going to work on the left side.
Left Section
Now you want to remember that when you're working on your left section it starts with rows of backward knots and then ends with rows of forward knots.
Step 1
Take the string that is to the far right (for me it's the teal) and make 5 backward knots on all the 5 strings until you reach the end like so.
Step 2
Next you're going take your new string on the far right and do the same as what you did with the teal colored string, ie making 5 backward knots on all the strings including the teal with which you just worked in the previous step.
Step 3
Keep doing the above 2 steps until you've used up all the colors ie until you've used up all 6 colors and until you have something like this.
Below we have made our first zig. We have to give it a zag now, which involves making forward knots.
Step 4
Take the same string with which you finished with last (for me it's the golden) and you're going to go back those 5 strings ie this time working with forward knots. So make forward knots on all 5 strings.
Step 5
Take your next color in line and do the same as step 4 making forward knots on all 5 strings.
Step 6
Keep doing steps 4 and 5 until you've used up all the 6 colors and until you have something like this now.
NOW WERE DONE WITH OUR LEFT SECTION. TIME TO WORK ON THE RIGHT SECTION
Right Section
Now you're working with the section on the right. It starts with rows of forward knots and then ends with rows of backward knots.
Step 7
Take the string that is on the far left (for me its the teal) and make 5 forward knots on all the 5 strings until you reach the end.
Step 8
Next you're going to keep repeating step 1 until you've used up all your 6 colors making forward knots with each.
Below we have made our first zig. We have to give it a zag now ,which involves making backward knots.
Step 9
Take the same string you finished with last (for me its the golden) and you're going to go back those 5 strings ie this time working with backward knots. So make backward knots on all 5 strings.
Step 10
Keep doing step 3 until you've used up all the 6 colors
Step 11-Joining Sections
NOW IT'S TIME TO CONNECT THE TWO SEPARATE SECTIONS WE WORKED ON.
So, take the two middlemost strings from either sections (for me is the teal) like so:
And just like the bracelet on the left we're going to connect the center either with a forward or a backward knot. It really doesn't matter since the strings are of the same color.
And after connecting you will have something like this. A triangular region at the center which gives a cool effect to the bracelet.
Step 12
After connecting the center you're basically going to repeat from step 1 and work your way until desired length
Step 13
Stopping when you reach the bracelet's desired length and finish it off however you like.
Alternative method:
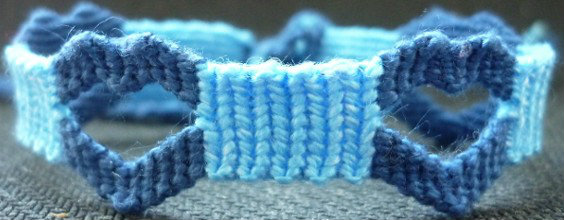
You can also make heart shaped zig-zag. If you use 6 colors as in the tutorial, you just have to change the right section of your bracelet.
Instead of making 6 stripes with forward knots and 6 stripes with backward knots, you have to do this:
Make 3 stripes with forward knots, then 3 stripes with backward knots, again 3 stripes with forward knots and finish with 3 stripes with backward knots.
If you make the rest of the bracelet as explained above, you'll get this (I used only 10 strings for this bracelet):

And that's all there is to the bracelet :)
Editors
The original author of this tutorial is peace1831 but it was also edited by Stefan, lorie, Jeckle, k_marie, Alicat, frenchie63 and kleinevos.
Uploaded photos (see all 37)


Comments