(( Bracelets )) Beaded Shaped Curve/Spiral Bracelet
| Table of contents |
|---|
| 1 - Introduction 2 - Materials Needed 3 - Getting Started 4 - Method 5 - Pro Tip |
[b]Introduction
[/b]Hi there, fellow knotters!
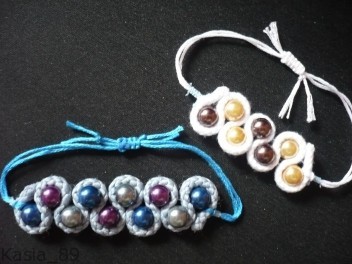
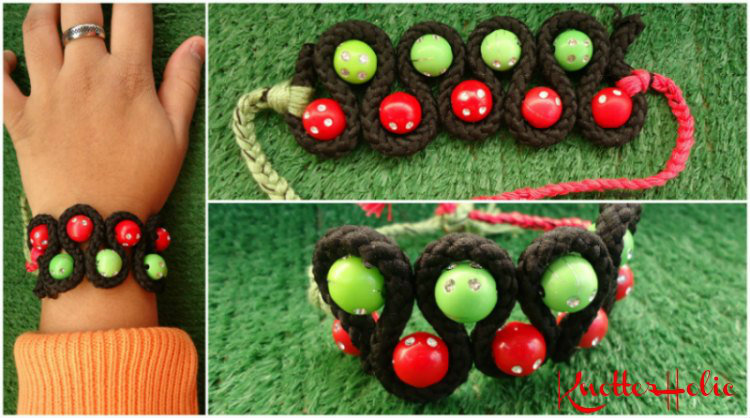
Here's the bracelet we will be doing today :

Please note that I did not come up with this bracelet on my own. I saw it through a picture online, but can't find it anymore since I deleted it from my PC after I figured out the method. I hope through the tutorial you will be able to make up the bracelet and enjoy it in the process.
This Bracelet is not your regular knotted friendship bracelet and doesn't use any knots, but it's a bracelet made out of thread so I decided to share it with you all just in case you wanted to learn it too.
Let's get knotting!
[b]Materials Needed
[/b]1) Rope string or a thick kind of rope through which you can string eye needles and sewing threads
2) Embroidery floss/thread
3) Sewing thread
4) Beads with a cylindrical hole through the middle
5) Scissors
6) 2 eye needles
7) A clipboard to mount your project on

You can find this kind of rope in your local craft store or you can just pull it off carrier bags like in the picture below:

[b]Getting Started
[/b]Take out beads of your choice and string about 20 - 25 inches/50 - 63 cm of sewing thread into your eye needles like so.


Make sure to leave about 2 to 3 inches/5 to 8 cm of string after stringing through the eye needle to prevent it from coming undone.
[b]Method
[/b]Lay your rope flat down and make a curve leaving about an inch or so at the right end like down below to allow your bead to fit snugly inside the curve. Make sure your bead is placed vertically with the two bead holes facing upwards and downwards respectively.


Take one of your eye needles and string through the rope and the bead hole to allow it to come out the other side.
Do Not allow your curve to go too far on the left. Make sure the bead fits in snug.


Do not pull your needle and thread all the way through the next curve because if you do it will be very hard to make the second curve through your needle. Always keep them at half an inch/1 cm after doing each wave/spiral like so:
Now, take your second eye needle and string it, this time, almost towards the end of the right edge like below. This will help us to alternate the beads on both sides. If you just want a single line of beads, then you skip this step.

Make sure both your needles come out neat and almost parallel to each other and not towards or far apart from each other. This will help your bracelet stay flat and neat.

Now, we are going to string in our second on the right side like as shown in the sampler down below:


Place your bead through the needle and make a curve with the rope like how you did at the start, this time, making it a left curve like so:


Like I said above, make sure your needles come out through parallel to each other and always almost to the middle of the rope.

So far, you will have something like this:

Now again, take your third bead, place it through your needle and make a right curve with the rope.

If you ever find your needle getting short after you make a curve, Press/Cringe your bracelet up until there's enough room for the needle and then pull out about to half an inch. You might have to always do this since your rope is thick and tends to come undone or open up easily.


Now, as you proceed through the bracelet, you will notice that your needles at one point push through the rope and once pulled inside, cannot come undone easily since the rope is thick and so is your needle.
This is why I always said to keep about half an inch/1 cm or whatever works best for you so that you do not have to keep pushing and pulling, making it difficult on your part.


[b]Pro Tip
[/b]Again, almost towards the end your needles will tend to be a little crooked, but try to make sure they always come out vertically and parallel to each other.
For this, here's what you can try to maintain neatness:
When making the curve, pull your needle closest to the curve vertically so as to make the bead fit in snug.
As for the second needle, do not tug your rope too hard and then insert your needle like so:

This will only lead to the needle being crooked after making a complete curve like shown below:

Instead, leave a little rope and then string your needle through. This helps, because, after making the curve, it occupies that little rope space and therefore the needle can push through vertically instead of a little being astray.
This helps keep your bracelet straight and your beads aligned on both sides.


As you can see I have run out of rope.

Now, you want to pull out your sewing threads with your needles - through the rope, making sure everything stays tucked in and there aren't gaps between the curves and beads.
Pull about 4 to 5 inches/10 - 13 cm through the other side and when you're satisfied, cut off your needles from the sewing thread.


And now you will have something like this:

If you want your strings to be secure and tight so they don't allow the rope and beads to come undone, you can tie a knot right towards the top with all 4 strings (2 down and 2 up.)

Now you must be wondering what to do because this is way too short to be a bracelet, especially since my rope is much shorter for a normal size bracelet, which is true.

For people who have longer ropes this won't be a problem as you could repeat the bracelet to your desirable length and end them with closures of your choice.
But this method is for the people who have shorter ropes. Here's where our good old embroidery floss comes in handy:
Now you are going to mount your project onto your clipboard for sturdiness and ease of work.

Take a piece embroidery floss (colour of your choice) and divide them into thick strands so as to make braids as closures or even square knots.
Fold them in half and, using larks' heads knots, Tie it onto the beginning of the rope in the bracelet as shown below:


Don't worry if your bracelet comes a little undone. You can always pick up your sewing threads and push up the bracelet since the other end is mounted onto the clipboard. But do not pull too far up, leaving no room for the above sewing threads.


Now this step is totally up to you. You could tie a regular knot with the two sewing threads, but I found out that if you do that, it will lead to deformity towards the end which doesn't look very nice. So instead, I made 3 square knots, which was much better since they were flat and did not tug on the rope at the end. It's also very secure, meaning your sewing thread won't come undone.
Towards the last knot, you can always add glue for more security and then cut off the excess sewing thread.


Repeat this on the other side as well.
After your done with both sides, you will have something that looks like this:

After that just finish up your bracelet with braids/square knots using the rest of the embroidery floss making it to your desired length and then you're done.
Look's more like a bracelet now, doesn't it?


Thank you all for having a look and I hope you enjoyed it just as much as I did .
Have a nice day ahead!
Editors
The original author of this tutorial is KnotterHolic but it was also edited by ririttt, iheartmrbump, Foz, Alicat, Kestrel and kleinevos.
Uploaded photos (see all 6)

Comments