(( How to... )) Tip: Keeping Your Long Strings Neat
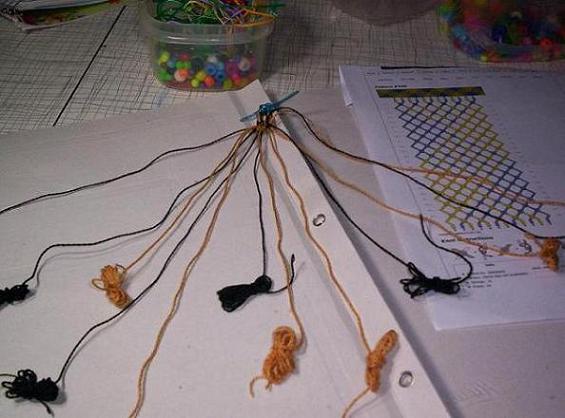
When you are making a bracelet at the start, the strings might be quite long making it difficult to knot. Or they keep jumbling up or changing order.Simply take the end of a string, wrap it around your finger several times, slip it off your finger, then knot the bundle of string neatly to keep it from unwrapping.
Do that for all the strings. Now work on your bracelet and when a string becomes short you can unwrap it gradually as you need.
It's very simple but I hope it was a useful tip for beginners!
Another time-proven procedure for winding up loops with easy access to new lengths of thread (you just give your bundles a little tug) is the METHOD USING FIGURE-8-LOOPS COMBINED WITH MARLING HITCHES:
It's best to first pull the far end of any long string you need to shorten temporarily through a lump of beeswax. (This is optional but makes for better grip and wrinkle-free string on the last 15 to 20 cm.)
Next you want to make FIGURE-of-EIGHT-LOOPS around pinkie and thumb of your right hand (starting with the other unwaxed end, palm facing you.) Leave a little length of thread you can later pull on.
Now secure the loop bundle you just created by applying a series of snug though not too tight MARLING HITCHES over it. This is to say that the figure8-loops are still on your right hand and you're doing the hitches with a little help from your left hand. A maximum number of 5 marling hitches will do but it takes a little practice until your fingers will start "remembering".
Marling hitches are basically sailors' knots closely resembling the half hitches used in friendship bracelets. There is still a marked difference though as you go through the bight from BEHIND when doing marling hitches ALONGSIDE an object:
https://www.youtube.com/watch?v=f4jdOcocEZw
Work your way towards the right with your marling hitches and do them as close to your right little finger as possible.
If you tie them correctly and APPLY ONE HITCH IMMEDIATELY AFTER THE OTHER, there miraculously won't be any knots left in your strings at all once your loop bundles have come completely undone after several tugs. If you find your marling isn't snug enough anymore, you can refresh it during knotting at any time.
For storage purposes, I actually do this marling thing to any bits and pieces of yarn longer than 1 meter and in fact to any skeins of embroidery yarn from the shops since the original skeins would be much more jumble-prone than this method.
Sometimes the sheer NUMBER of bundled up strings poses a problem though. Suppose you're doing a 40-string bracelet and at some point find yourself spending more time with untangling than knotting, as good as the above mentioned methods may be.
The root of all evil seems to be found in about a dozen factors: The working part of your strings still has to have a CERTAIN LENGTH, like it or not. GRAVITY plus the TWIST your strings have been given at the factory may all conspire in producing severe situations of entanglement, especially when you're talking about a CONSIDERABLE NUMBER OF STRINGS so CLOSE TOGETHER. Working too FAST, possibly with threads you have SPLIT IN HALVE, can also be aggravating factors that will produce kinks and snags. Winding up your little bundles too TIGHT will make your strings even CURLIER. When testing an X-large pattern with a lot of DIAGONAL CROSS ACTION going on (forward knots on one side of the bracelet constantly competing against backward knots coming from the other side), I observed that the whole thing had a strong tendency of curling up into several little braids that kept turning and turning until they became an inextricably intertwined and twisted little rope...
You can avoid this predicament by using the LAPTOP/TABLETOP METHOD as I call it:
Work at a table in front of your laptop.
View the hefty oversize pattern you'd like to do on your laptop with the screen zoom set to about 200 per cent.
Tape down the 40 or so already bundled up strings of your bracelet (as described above) but towards the edge of the table.
Now go and FOLD BACK all your strings, FAN THEM OUT in an ORDERLY FASHION and HANG THEM OVER THE UPPER EDGE OF YOUR LAPTOP' S SCREEN!
Just pick the 2 strings needed now for the next knot in your pattern.
Do the knot and lay out the 2 strings you have just used towards the left of your tabletop, letting them dangle down the left edge of your table.
Grab for the next 2 strings in your fan that will become active.
Do the knot.
Put the 2 old strings that had been used before back in the fan of strings spanning over your laptop.
Place the 2 newer strings to the left so you always know exactly what has been your last knot.
Fumble for the next 2 strings in the fan becoming active, etc., etc.
I've found that this method saves you a lot of time and nerves.
The beauty of it is that you can put your computer to good use in a twofold way:
as a tool for showing you the large pattern you're working on (albeit through a veil of strings)
and as a contraption to help keep your strings separated, clearly arranged and thus unjumbled and carefree.
Editors
The original author of this tutorial is hendhuhe but it was also edited by k_marie and PetertheRoman.
Uploaded photos (see all 2)

Comments