(( Closures )) Ribbon Clamps
Equipment/Supplies
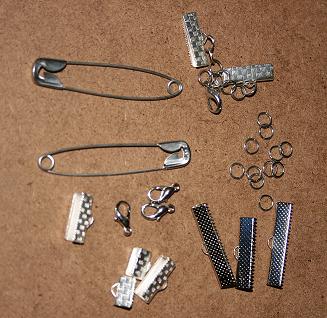
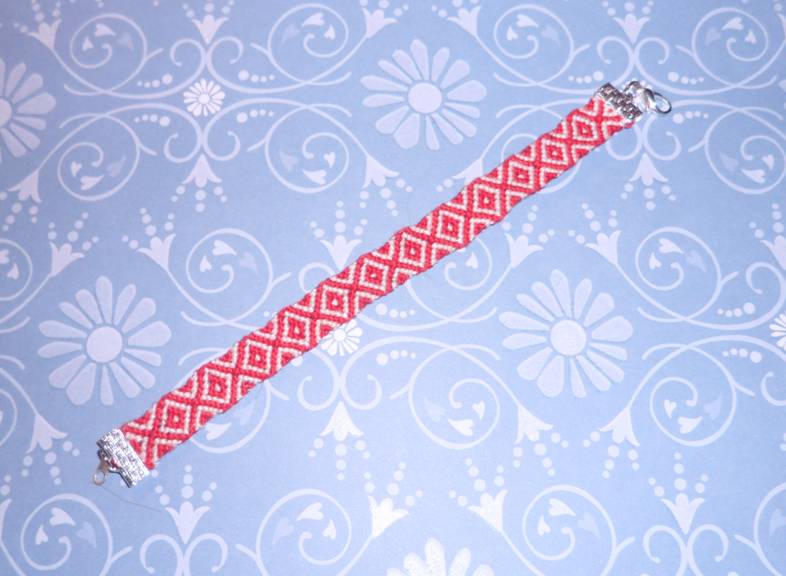
Ribbon Clamps
You can buy these at a craft supply store or find them online. They come in a variety of lengths and finishes. You will want one that covers the entire width of your bracelet.
Metal Rings/Chain
These will attach to the loop in the top of your ribbon clamp. They come in various shapes, sizes, and colors. You can use the metal rings and attach them to make your own chain, or buy chain lengths already put together and you just unhook the amount that you need.
Clasps
To attach your bracelet together, you will need some kind of clasp. There are several varieties out there available including
- Barrel Clasp
- Spring Rings
- Toggle Clasps
- Fold-over Clasps
- Lobster Clasps (Best to use, makes bracelet adjustable)
Pliers (Flat & Needle-nose)
You will need a pair of pliers in order to secure the ribbon clamps to your bracelet. Any type of pliers will do in a pinch, however it is recommended that you use a pair of flat pliers as they cover more area and flatten the clamps easier.
The second set of pliers will be needed to secure the rings and chain to your ribbon clamps. Needle-nose pliers work best for this.
Glue (Optional)
You may or may not want to use glue underneath the clamps before you secure them just add an extra bit of strength to your bracelet.
Beginning Your Bracelet (Clamp Set-Up)
Safety Pin Method
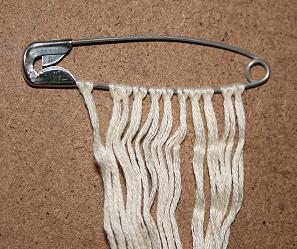
The easiest way to begin your bracelet is by starting with larks-head knots around a safety pin (make sure you make the knots on the side of the pin that opens so you can slide the bracelet off easily when the time comes).
If you have a pattern that has an odd number of threads (typically for alpha patterns) all you have to do is tie the single string around the safety pin.
If you are unsure of how to do the larks-head knot, there are excellent tutorials found here (great for alpha style) and here (great for normal patterns).
Finishing Your Bracelet (Clamp Set-up)
Knot Method
To finish the bracelet, simply double up the strings (or triple if you have an odd number) and simply tie a knot as close to the bracelet as possible. When you have finished, cut all the loose string off so that the ribbon clamps will fit securely over the bracelet.
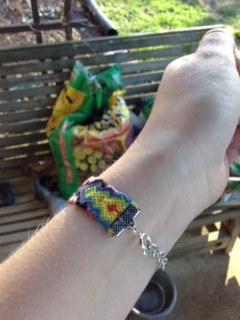
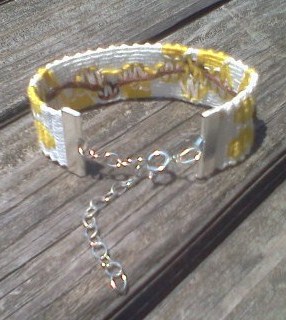
Attaching the Clamps / Finishing the Bracelet
Putting on the Ribbon Clamp
Once again, you need to make sure that the ribbon clamps is the same size as your bracelet for the best finish. If you are slightly short it will work as well. There are also methods where you can put a piece of firm fabric across the ends of your bracelet first that way if the clamp is too small it won't be as noticeable.
Simply slide the open part of the ribbon clamps over your bracelet (if one side only has teeth, but it on the underside of the bracelet so it won't be as noticeable in the end product) and using a set of flat pliers (or regular pliers if that is all you have). If you wish to do so, now is the time to apply glue to the bracelet just under the ribbon clamp. Begin to apply pressure and close the clamp around the bracelet. Note: make sure to keep an eye on how your clamps is sitting on your bracelet. This is the time where it will slip and become crooked). It is the easiest if you start at one end first then switch to the other end and finally the middle of the clamp.
When you have finished the first clamp, simply switch to the other end of your bracelet and attach in the same manner.
Attaching Metal Rings and Clasp
Starting at one end of your bracelet, the first thing you want to do is attach metal rings to the ribbon clamps so that you can put your claps on your bracelet. The average that seems to be used is three. Simply open the ring, slip it into the opening at the top of the clamp and use your pliers to bend the ring back into shape. Repeat this until you get to the final ring where you will attach the claps (note, you may have to attach the other part of the clasp to the other side of the bracelet depending on which style you use)
Attaching Length Chain
In order to make your bracelet adjustable, you will need a length chain on the other end. You can either attach several jump rings together to make your chain, or use a pre-made chain section. At this point of time you could also attach a charm to the end.
Once you have it firmly attached to the ribbon clamp you are done! Now it is time to enjoy your bracelet.
VIDEO TUTORIALS
By Masha Knots
By PloegetteDesigns
Editors
The original author of this tutorial is RockePloeger but it was also edited by Sareana, SweetJeannie, k_marie, kleinevos and Masha_Knots.
Uploaded photos (see all 14)
Comments