(( How to... )) Knots Used for Bracelets
| Table of contents |
|---|
| 1 - Introduction 2 - The Hitch 3 - The forward knot (fk) 4 - The backward knot (bk) 5 - The forward backward knot (fbk) 6 - The backward forward knot (bfk) 7 - Afterword 8 - Videos |
Introduction
This is a quick tutorial/guide for understanding the four basic knots used in the thousands of patterns you see on this website. Understanding these knots is key for tying and designing these bracelets, so I advise you to invest some time in learning these basics.
The Hitch
The base knot used in friendship bracelets is the hitch. It can be tied to the left or to the right on top of another string. The image below shows you how to do the knot in the different directions.
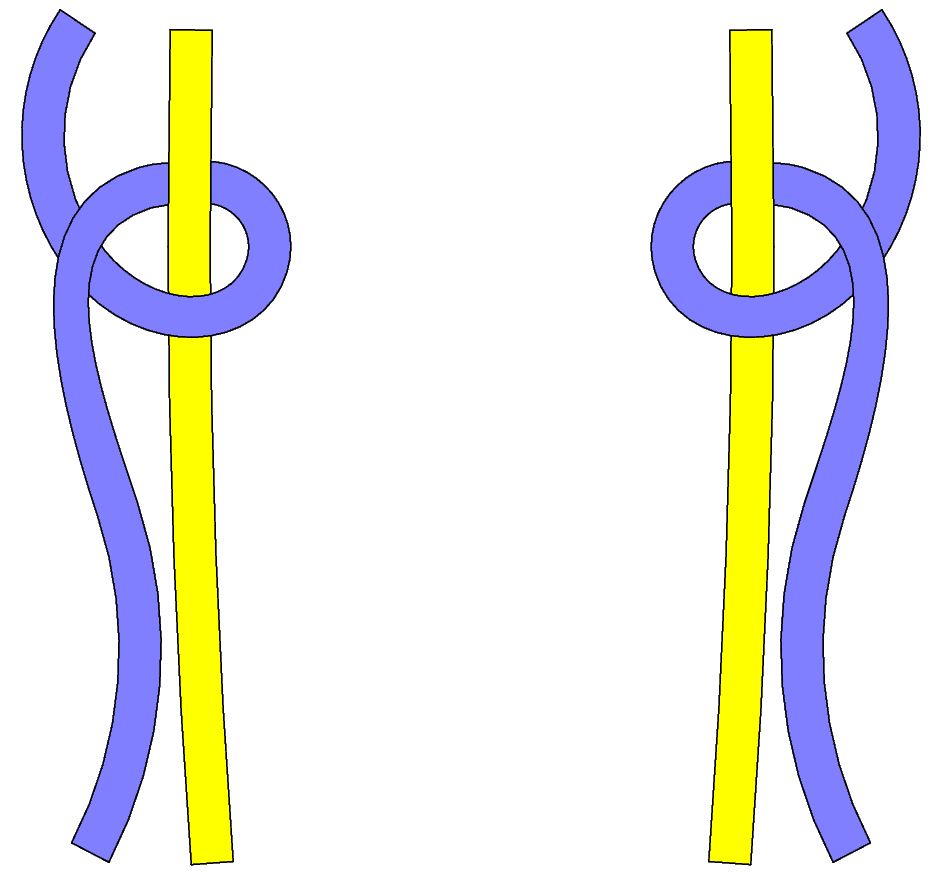
The four basic friendship bracelet knots use double hitches in different combinations.
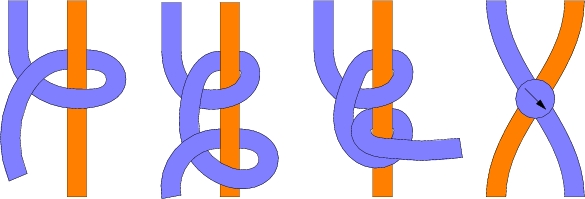
The forward knot (fk)

The forward knot, which is represented by an arrow that goes down diagonally to the right, requires that you make two hitches using the left string on top of the right string. After doing so, the strings should have switched place, and the color of the knot will be the same as the color of the string that began on the left.
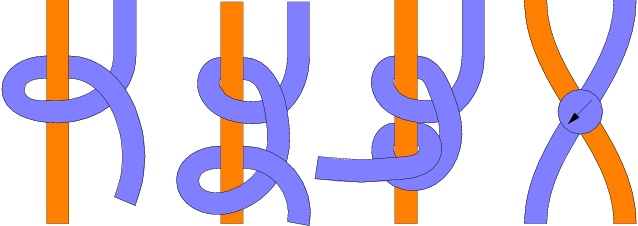
The backward knot (bk)

The backward knot, which is represented by an arrow going down diagonally to the left, requires that you make two hitches on the left string using the right one. The strings switches place just like in the forward knot.
The forward backward knot (fbk)

The forward backward knot is represented by an arrow which initially goes down diagonally to the right and then down diagonally to the left. We will take this step by step to avoid confusion.
1. Use the left string to tie one hitch on top of the right string.
2. Let the strings switch place.
3. Use the currently right string to make a left hitch on top of the left string.
4. Let the strings change place.
The strings changed places 2 times, which means they are in the same position as they started in.
The backward forward knot (bfk)

The last of the knots is the backward forward knot. The arrow initially goes down diagonally to the left and then down diagonally to the right. It requires that you use the right string to tie one hitch on top of the left string.
1. Use the right string to tie one hitch on top of the left string.
2. Let the strings switch place.
3. Use the currently left string to make a right hitch on top of the right string.
4. Let the strings change place.
The strings changed places 2 times, which means they are in the same position as they started in.
Afterword
Although these arrows, especially the third and fourth mentioned above, can be tricky at first, you will understand them with enough practice! Nothing comes easily, but if you can master these knot basics, I can assure that, with enough effort and patience, you can master every single one of the bracelets posted on this website!
Videos
In the below video, it shows you how to tie the 4 basic knots: the forward knot, the backward knot, the backward forward knot, and the forward backward knot.
Editors
The original author of this tutorial is mae_ismusic but it was also edited by kiki6200, Stefan, spiffehgymnast, Dianasha, Foz, Kestrel, k_marie, mysterytour, Masha_Knots, moonaaxo, kleinevos and ManiJJManillas.
Uploaded photos (see all 61)
Comments