(( Projects )) Star/Snowflake
Many of you have asked me how to knot the star/snowflake-thing I made, so I just decided to give it a try and make my first (non german) tutorial here.I think you should be more experienced at knotting before trying this.
I'm not good at writing tutorials and English is not my mother tongue... I'm sorry, but maybe this is at least a little bit useful...
1.
First, take a look at the following tutorial.

If you make 4 of these you can connect them to make a square like this :

If you make 6 of these you can connect them to make a hexagon. That's what you need to do to make a snowflake.
[b]2.
You can also make a hexagon using the following method:
You start with 6 strings and add color by color.
Number of strings needed :
6 x lime
6 x olive
6 x white
6 x grey
6 x dark violet
green
6 x blue


Every circle is one knot, the green strings are the strings you started with, the yellow strings are the strings you have to add. Keep adding strings like in the first part of this tutorial ( the first method ).
Then, when every string in each of the 6 parts is used, the star in the middle is ready:

You can also have a look at the tutorial for a pencil case to see the knotting of a hexagon/star shape.
4.
Next, you start tying 6 normal bracelets like I did.
(you don't have to use the same pattern I did; you can choose an easier arrow pattern like this: https://www.friendship-bracelets.net/pattern.php?id=2 ... This one would be similar to the one I used: https://www.friendship-bracelets.net/pattern.php?id=218)

5.
When they are long enough (about 10 rows each would be okay, I think) you can separate the strings in two bundles and knot some corners (here in an easy candy striped way - one in the left, one in the right direction: https://www.friendship-bracelets.net/pattern.php?id=6858)
Do this with every one of the 6 star "rays", so that you have 12 smaller bracelets (with about 9 rows each) forming angles at the end of the 6 straight bracelets. Knot until the smaller ones meet in the middle of the rays.
6.
Then, you can fix them together like this:

(you can use the arrow pattern again and unify the striped "rays" like in the picture).
You have to do it 6 times, then your star or snowflake is ready:
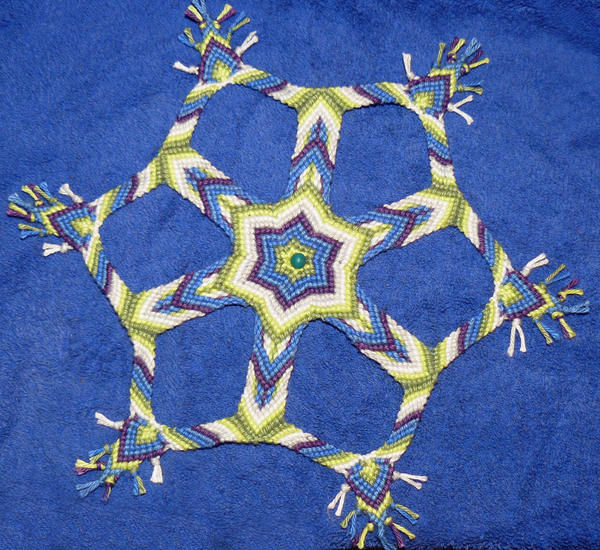
I hope this was useful and at least a bit understandable!
Editors
The original author of this tutorial is Nimue but it was also edited by Mina, k_marie, Friendship_123, kleinevos, Kestrel, Vahidsbt, Gusty and Allison98.
Uploaded photos (see all 44)


Comments