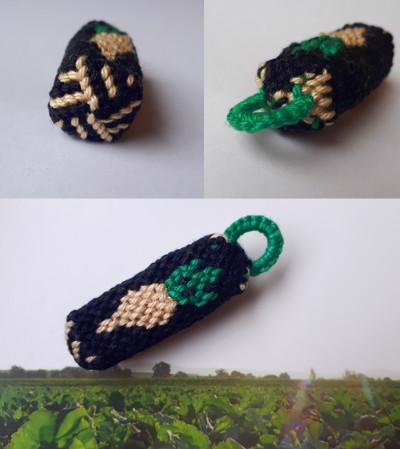
(( Projects )) Macrame box with lid
Box alpha-style
You need:
- A lot of short strings. About 50-60 cm is enough for a box that's about 4 cm wide and 4 cm high if you are using yarn (125m per 50 gramms).
For this box I used:
- 4 red strings
- 4 orange strings
- 4 yellow strings
- 4 green strings
- 4 blue strings
- 4 purple strings
- 8 black strings
- For the white crosses:- 16 shorter strings, about 30 cm each.
- Glue
- 1 long string, black. Take a whole skein or a couple of meters. Or take a short piece of string for every circle you make, if you don't like the box to be spirally. In that case you should have a look at the pictures for the lid ( below ) first.
Take the red and the orange strings and the long black string. The black string is going to be the base-string.
Make a forward knot with one of the red strings onto the middle of all of the other red and orange strings.
Start knotting the red strings onto the long base-string with forward knots.
Knot all of the 8 ends of the red strings close to the knot. Leave the orange strings for now. This will make a circle.
This is what the other (good) side looks like now. The starting end of the base-string has to be at the knotside. I forgot that in this case, so I brought it there with a needle later on . . :-)
Keep on knotting to make the second circle: you knot first one red string, then one orange string, etc. onto the base-string.

7 and 8 For the next circle you need the yellow strings. Add them by knotting them onto the base-string with a forward knot when you need them. If you knot the first knot in the middle of the yellow string you can use the other end the next time you need yellow. That'll save you some knots or glue in the inside of the box.
This is what the good side looks like after 3 circles.
10 Keep on adding colors, every new circle one color. This is what it looks like after 6 circles.
11 This is what the knot-side looks like after 6 circles.
12 After adding all of the colors I added black strings the next two circles. In this case it's easier to add the strings with a larksheadknot in the first circle and use both ends for knotting the next circle. You don't have to add new strings in the second circle that way.

13 This is the knot-side after 8 circles.
14 When you stop adding strings and keep on knotting, the edges will stand up by itself. You can control the width of it a little by sliding the base-string through the knots.
15 and 16 I find it easier to start knotting from the outside now. The knots itself are still the same, only knotted from the backside! I like to put something that's round inside the box to control the width of the box a little better.
17 You can also knot with the base-string ,like in a two colored alpha, to change colors. To change structure you can also put the knot-side to the outside of the box if you like. (See below in the lid.)
18,19,20 This is how I added the white strings. This is another way of changing colors, more like in a multicolored alpha. This might not be the best way ! It worked for me, but I wouldn't change too many strings in one circle this way !
21 The last circle is knotted with the knot-side to the outside.

22 and 23 And now you only have to cut and glue the ends of all of your strings!

If you make another one just a little bit wider and shorter you can use that as a lid for your box.
This lid is made with a different base-string for every circle. This makes the pattern a lot nicer, I think.
24,25,26,27 The yellow string is the base-string: Make the last two or three knots of every circle around both the start and end of the base-string. Pull the ends till the base-string isn't visible from the outside and the circle is nicely closed.

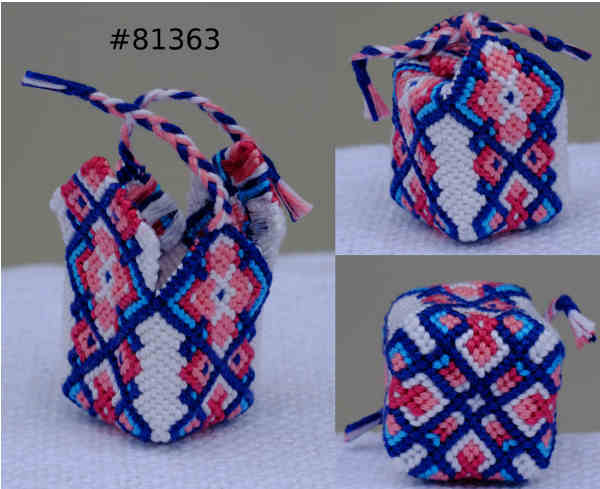
Box with a (normal) pattern
There is another way you can make a box, with the use of a pattern:
Pick a pattern. Any pattern will do, the wider the pattern, the bigger the box will be. If you use a small pattern you can double the pattern or add strings at both sides to make it bigger.
Cut your strings, enough to make two times your chosen pattern, so if you've picked a 20-string pattern you need to cut 40 strings.
Length depends on the pattern and on how high you want your box to be. For my 50-string pattern box I needed about 140 cm of crochet-yarn to get a nice box.
Line the strings up in the order of a diagonal line in your (normal) pattern, starting halfway your strings.
I've chosen
I'm starting my pattern at row 43, at the gray knot in the middle. I'm knotting diagonally to row 54 on the outside, following the pattern. So the right string-order is right above/ next to these diagonal line of knots in your pattern.
Flip the tape and strings over, upside down.
Start knotting till you have a square with one point up (your first knot) and a point down ( your last knot ).
If you think your box needs to be bigger you can simply add more strings on the outside, where the red dots are ( see picture ) .
I've added a few black strings and knotted them into the pattern in the direction of the red arrows.
You can connect them with forward-backward- or backward-forward-knots to the strings of the pattern. Like adding border-strings, see : xl-border tutorial
You need to do the above twice before you can proceed.
Lay these two pieces down like in the picture. You now have exactly the same string-order to the right- and left-side as when you started your first part of this box.
So you can knot the strings together like you already did twice.

This is how it looks like after you've knotted three of the four parts. Start knotting the last part of the square.
The square is now completed.
10 Now you can start shaping the box : Bend the sides down from the middle of one side to the middle of the other side. That's the same spot as where the parts were knotted together.
11 Take the 2 strings in the middle of one of these sides and knot them together.
12 Take the 2 strings next to these strings and knot them onto the previously knotted strings, just like a chevron. Unless these strings are part of the pattern, of course!
13 Proceed with the next strings. It's now just like knotting a tube-bracelet or a pouch

*You can make a lid the same way, just not as high and with an extra string added so it will fit around the box.
Stop knotting the square a few rows before you reach the corner, or it will probably be too high!
*Since the square has straight lines you can of course also use an alpha-pattern as long as it has strings sticking out at all 4 sides to be able to knot the sides of the box.
*You can end the box like a pouch, or just stop knotting and glue the ends to the inside of the box. Or knot one row like in the alpha-style box before glueing.
*You can end the lid the same way or even use the shaping technique.
It's all up to your creativity !
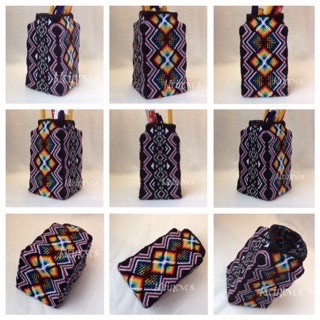
Note that it makes a lot of difference in which row you start knotting the pattern!
Same pattern, different start:

Editors
The original author of this tutorial is kleinevos .
Uploaded photos (see all 12)
Comments