(( Bracelets )) Shaped Zigzag Bracelet with Vertical Stripes
| Table of contents |
|---|
| 1 - Introduction 2 - Materials and Set Up 3 - Knotting Instructions 4 - Pattern 5 - Video |
Introduction
Ok guys, a lot of you have asked me how I do the zigzag bracelets with vertical stripes. So here it is. :) Before attempting this bracelet, you should be comfortable making both the regular zigzag bracelets and alpha bracelets (not multicolor alpha). (And if you want to make a double vertical zigzag, you should be able to do the regular double zigzag.)
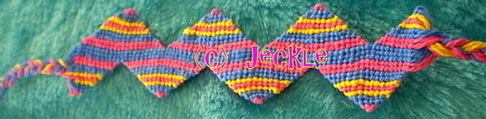
This type of bracelet is tied in the alpha style, but structured as a modified zigzag. It is almost completely tied with the letter strings. If you look at my photos, they are not true zigzags, the middle section is solid through the whole bracelet. This means that they do not weave through the bracelet like the other strings. They just tie straight down onto the strings that are being woven sideways. I find they lay flatter on wrists if I do this.
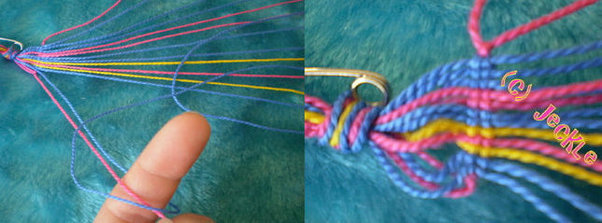
Materials and Set Up
First you choose your colors and number of strings. For the example I am choosing 14 strings and I will be using blue, yellow, and pink.
Your color pattern has to mirror before it hits the solid middle section or else the two sides will look different. I highly suggest you use two of the same color strings on the edge (and again just before the solid stripe because it has to be mirrored). It makes the points of the zigzag much cleaner if you can tie with the background string instead of the letter strings. For example, my colors are Pink = P, Blue = B, and Yellow = Y, I will use S for the stationary strings (they are blue in this bracelet). My string layout is: PPBBYPYBBPPSSS. So the pink strings in the middle of the two yellows is the center of the pattern and it mirrors out on both sides from there. The left side of the pink is PPBBY, and the right side is YBBPP. I think coming up with a design is harder than actually knotting the bracelet. ;) The reason it must mirror before it hits the stationary strings is that the first string on the left side will be the string right next to the middle on the right side. If this is confusing, keep reading and the pictures will help. :)
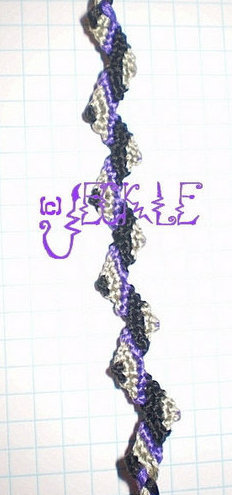
This was my first attempt while trying to figure out if it would work to make vertical stripes. As you can see, I didn't yet realize about the need for mirroring. My string layout was black, black, silver, silver, stationary purple. This made the bracelet end up being black, black, silver, silver, purple, black, black, silver, silver.
Knotting Instructions
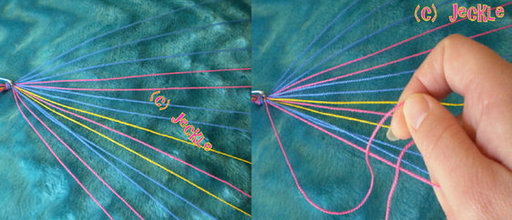
Ok, so first I have my strings laid out. I have PPBBYPYBBPP and the three blue strings that are stationary. To begin, you tie a background-onto-letter knot with the first pink string. This is the point, so it is the only place you tie with the background string.
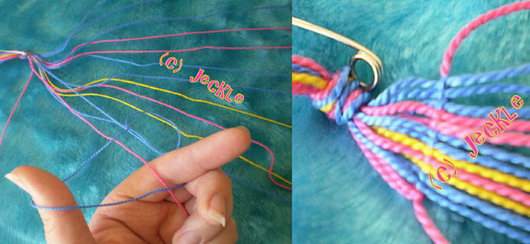
Next you tie with the blue letter string onto the pink string. You continue this way tying the letter strings onto that first pink string until it is on the left side of the three blue stationary strings.
Now you are ready to start the second row. You tie the blue letter string onto the new pink background string. You continue this way tying all of the letter strings onto the pink background string.
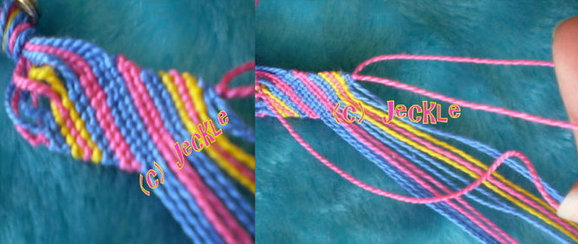
Continue this way tying all of the letter strings onto the new background strings until the leftmost strings are the three blue stationary ones. Now you are ready to go back the other direction. The rightmost pink string is now your new background string. Tie a knot with the background string onto the pink string to the left of it.
Continue tying with the letter strings onto the pink background string until it is on the left of the stationary strings. Keep going with the pattern of tying the letter strings onto the new background strings until the three stationary blue strings are on the right again.
You are now back at the beginning, tie a knot with the leftmost pink string onto the first pink letter string. Continue tying onto the pink background string with the letter strings.
Pattern
I've made an arrow diagram for the pattern, so if you're doing the same stripe pattern as me you can follow this one. I'll also upload a blank one for the same amount of strings and you can print it and color it as you like. :)
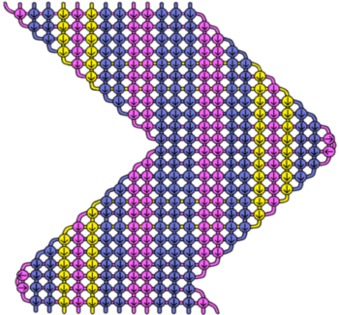
Once you get the hang of it, you should be able to do this bracelet with any number of strings and any color design you like. :)
Video
I made a video for those of you who like that type of instruction better. :) The video is of a double zigzag, but I only filmed me doing one half, so it works the same. I also explained how to join the two sides if you would like to make a double zigzag.
If anyone has any questions, feel free to post them here or PM me.
~Jeckle
Editors
The original author of this tutorial is Jeckle but it was also edited by Alicat and kleinevos.
Uploaded photos (see all 14)
Comments