(( Patterns )) Multi-Colored Alpha Bracelets
Introduction
This tutorial is supposed to teach you how to make multicolor alpha pattern bracelets. That is, more than two colors. Make sure you understand two-colored alpha bracelets before reading this. It can be a bit confusing if you don't.
(See the tutorial Alpha/letter patterns). This tutorial can be confusing if you haven't.
Simple 2-color alpha
Now, recall how to make alpha bracelets. An ordinary 2-color alpha bracelet may be described like this:
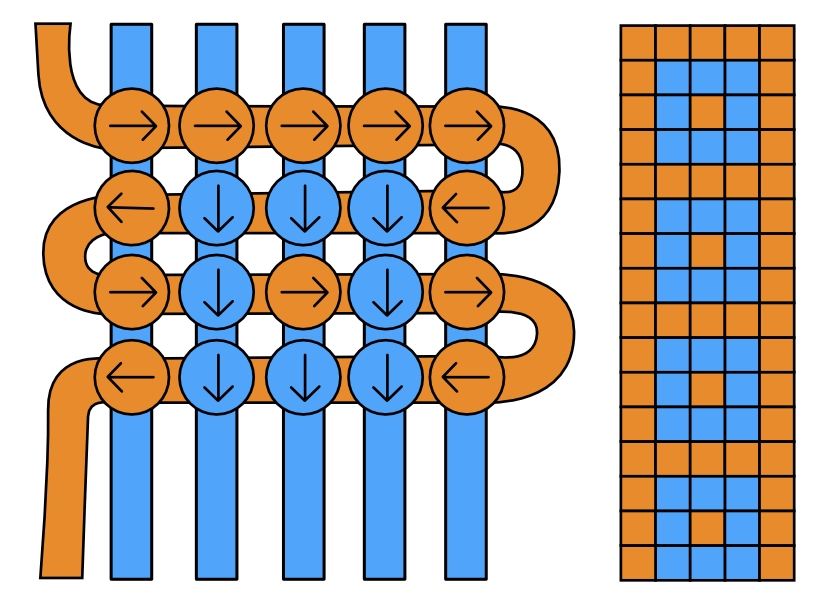
What does the "down" arrow mean? If you are doing a row of forward knots, the "down" arrow means to do a backward knot. If you are doing a row of backward knots, the "down" arrow means to do a forward knot. It should be clear if you know how to do two-colored alphas.
explanation with pictures:
TWO COLORED ALPHA
1.
Take as many base-strings as there are squares in your pattern, vertically, which usually is the smallest side of the pattern.
2.
Take a large string, or a whole skein of floss, and tape the end down. Make a forward knot onto the first base-string.
*For a nice clean edge you can also use a BF-knot.
3.
Keep making forward knots with the long string, also called background-string.
4.
When you reach (in the pattern) a square with a different color, you need to make a knot with a base-string: take the next base-string and make a backward knot onto the long string.
5.
Change back to knotting forward knots with the long string as soon as you reach a square with the first color again.
*Make sure that the base-strings are always straight, not curved, to keep the whole bracelet and the edges straight. If you make the first half of this knot too tight it will pull the bracelet out of shape, especially when you've made more than one knot with the base-strings right before a knot with the background-string.
6.
At the end of the row: Change direction with the long string: proceed with a backward knot onto the first base-string at the right-side to start the second row.
*For a nice clean edge you can end the first row with a FB-knot and start the next row also with a FB-knot.
7.
Keep knotting backward knots till you reach a square with the second color. Make a forward knot with the next base-string onto the long string to make that next knot in the second color.
*Try to keep the knot as close to the previous row as possible by holding the long string horizontal while tightening the knot.
8.
Change back to knotting backward-knots with the long string as soon as you reach a square with the first color again.
9.
At the end of the row you change direction with the long string again. Start the third row with a forward knot.
*To make a nice clean edge you can end the row with a BF-knot and start the third row also with a BF-knot.
Keep knotting like this till the bracelet is long enough, every uneven row like row 1 and every even row like row 2.
Simple vertical string substitution
Now, the task here was to make a pattern with more than 2 colors. We begin with the simplest case: arranging your "letter strings" or "base strings" in this order: light blue, red, green, dark blue, light blue. That will make this result:
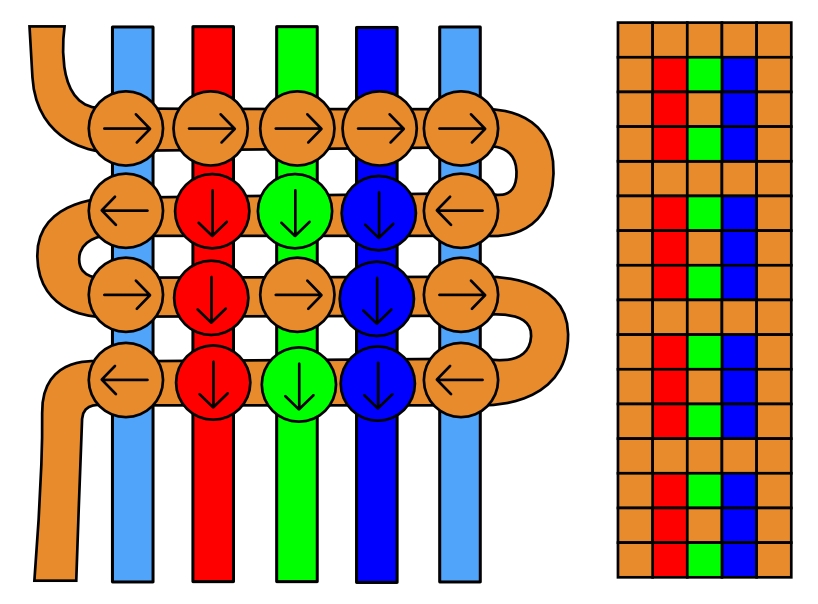
This is the most simple version of multicolor bracelets there is.
Background color substitution
Now we are going to make things a little more difficult for us. The "background color" (orange) is being substituted once for a yellow thread. That would make the bracelet half orange, half yellow. The below image shows how this is done by just joining the threads with a simple knot.
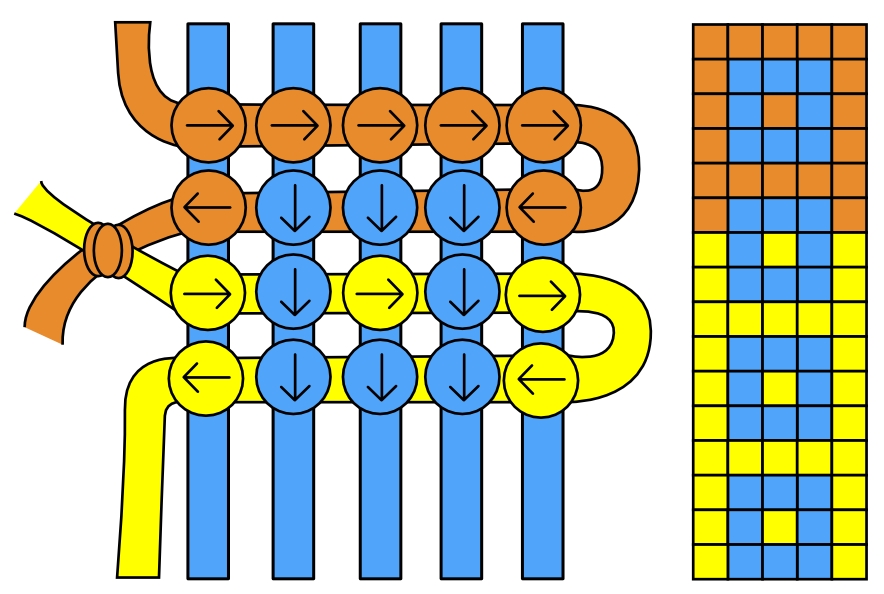
You can also do this without adding or removing any thread. Before you begin tying, replace the leftmost blue string with a yellow one. Replace the last (left most) knot on the second row with a forward-backward knot. When you have done this, the yellow string should be the leftmost string. Take it and continue tying with this string as background string.
String substitution during tying
Now we have done two kinds of multicolor alpha patterns. But the tutorial does not stop here. You may want to change the "letter" color sometimes too. What if you want the squares to be blue, yellow, blue, yellow, and so on?
Setup the strings as you want to make an ordinary bracelet with only blue squares (like the first example I made in this tutorial). The mission is then to substitute the blue knots for yellow ones every second square.
The method is simple. Just sneak in a yellow thread when it is time to make a yellow knot. Take a look at the image below.
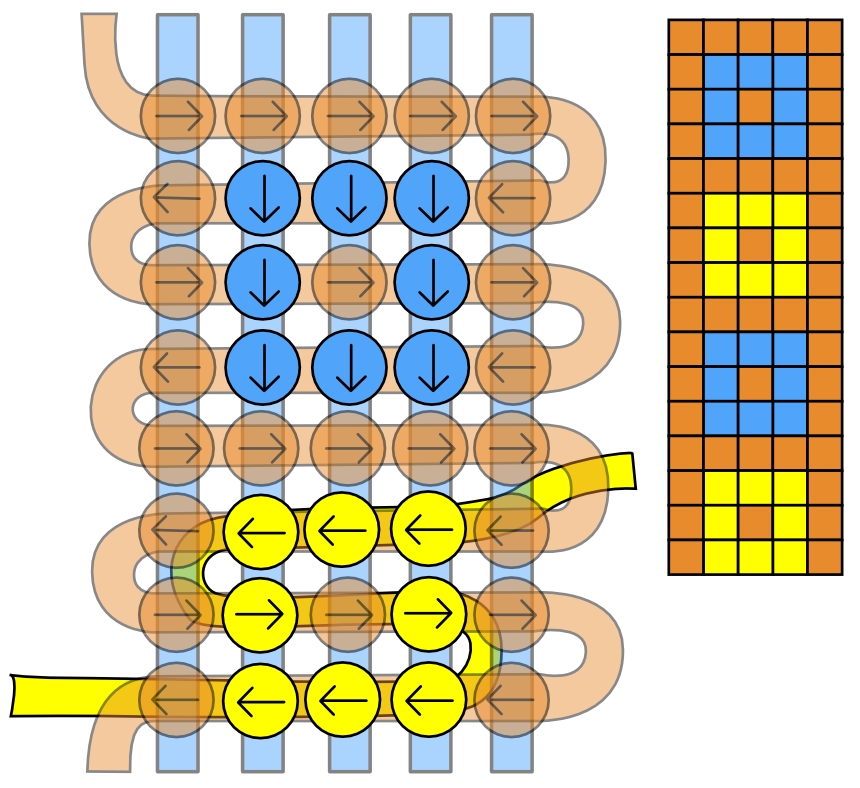
Let's go through the steps, beginning on row 6 from right to left.
Row 6
1. An orange knot is made with an ordinary backward knot to the left.
2. The orange string that you just used is brought aside. Instead, a yellow string is brought in. Use it to make backward knots onto the three blue strings in the middle.
3. Now it's time for an orange knot again. The yellow string is brought aside. Where is the orange string now again? It is way out to the right. Solution: just jump over the latest 3 yellow knots on the back of the bracelet to reach its home again. Make a backward knot.
Row 7
4. Make an ordinary forward knot with the orange background thread.
5. Put the orange thread aside and bring in the yellow one again. Make a forward knot with the yellow thread.
6. Put the yellow string aside. Jump over the last knot with the orange string and make an orange forward knot.
7. Put the orange string aside again. Use the yellow thread and make a forward knot.
8. Put the yellow string aside. Make an orange knot with the orange string.
Row 8 is exactly as row 6, so follow the instructions for that row.
Loose strings
The loose yellow thread needs to be fastened before it is introduced. It can be done by weaving it into earlier knots.
There will also be loose strings when jumping here and there with the different strings. There is nothing to do really, and it does not matter if they hang a bit loose on the back of the bracelet.
Put aside?
In the tutorial, I talk about putting strings aside. What I mean is that the string should be pulled to the back of the bracelet (from you, not towards you). If you do the opposite, then the loose threads will be visible in the nice side of the bracelet, and that is not really the goal.
Multiple letter strings
The key thing about this method is replacing one letter string with several strings. In the example I will show you, I will add one blue with a blue string and a yellow one.
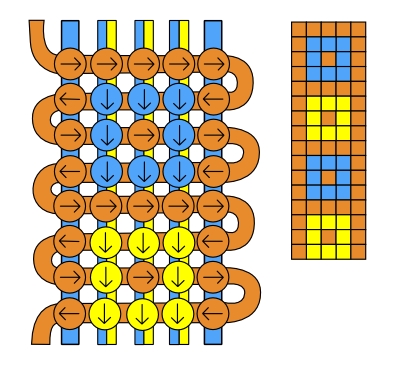
When the letter strings are two, it is very easy to choose between them when it is time to make a letter colored knot. In the image above, these knots are recognized by the arrows pointing downwards. Simply use the string in the desired color when it is time. The string that is not used can be hidden on the back of the bracelet.
You can replace a string with three or even more other strings. The downside of this is that the bracelet can become thick and the knots may be deformed.
Combining the methods
The methods are usually combined to make it easier and to save string.
explanation with pictures:
MULTICOLOR ALPHA, SUBSTITUTION METHOD

1.
Start the first row from left to right, making forward knots onto the base-strings.
*Tape the end of the knotting-string down before you start.
*You can attach all of the base-strings to a wooden stick or a crochet hook with larkshead knots for an easier straight start. If you don't start the bracelet with a loop that is. ;-)
When the bracelet is finished you can simply remove the stick again and make the braids.
*Don't knot the first rows to tight: You need a little space inbetween the base-strings because of the string-adding later on. If you start knotting too tight, the bracelet will be wider where more colors are added, especially with wider bracelets.
2.
Second row: Make a backward knot with the dark-orange string you used in the previous row.
3.
After that first knot you need to add a new color, blue in this case:
-Tape the end of the blue string down.
-Take the blue string and put it behind the first base-string on the right-side and on top of the previously used knotting-string, dark-orange in this case.
-Make a backward knot onto the next base-string with the blue string.
*Pull the dark-orange string gently after you've made this knot. That'll turn the upside of the last dark-orange knot up, where it belongs.
4.
Keep knotting backward knots with the blue till you need the dark-orange again.
Add the dark-orange like you added the blue:
-Take the dark-orange from behind. The string needs to be under all of the base-strings that are inbetween the next base-string and the last base-string that has a dark-orange knot around it.
-The dark-orange needs to go over the blue knotting-string.
-Make a backward knot onto the next base-string with the dark-orange.
-Pull the blue string gently.
*Don't make the first half of the knot too tight: That'll shorten the part of the dark-orange string that's 'hanging' at the back of the bracelet and cause tension, which will pull the bracelet out of shape. To avoid that, you can add a new dark-orange string instead of using the one that's previously used. If you do that, it will give you more loose ends to glue and/or knot together at the end though, and if you have the tension right the 'hanging' parts will even strengthen the bracelet a bit.
5-6.
Third row: Make forward knots again, same as in row 1.
Change colors like you did before: a new color comes from behind, and goes over the last used knotting-string.
Fourth row: Make backward knots again, same as row 2.
Proceed like this, always all forward knots in uneven rows, and all backward knots in even rows.
Video Tutorials
By Masha Knots
By lonelysoldier17
By BeyondBracelets
By Kleine Vos
Editors
The original author of this tutorial is Stefan but it was also edited by eternity26, Gracie04, Darqflame, Lovemenot, iluvmyspud, cupcakefriends, Sareana, myanichole12, Just_Ice, carson, x3peacex3, usr40717, Whyknots, lorie, BeautyBracelets, ririttt, Jeckle, Dodadoo, Kestrel, k_marie, usr58785, moderna2009, Foz, Srch4Nvrland, kleinevos, piggyfan2 and Masha_Knots.
Uploaded photos (see all 994)


Comments