(( Beginner Tutorial )) How to make #2 - chevron
Introduction
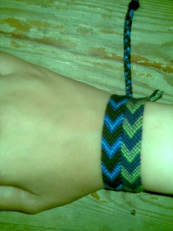
This tutorial shows how to tie the arrowed bracelet #2. If you want a printer-friendly version in PDF, click here
Strings and setup
To make this bracelet, you will need yarn or threads in different colors. In this example I've used 8 threads. The length should be about 50 cm (20 in) when you start to tie. Below you see a solution for starting using an overhand knot.

How to
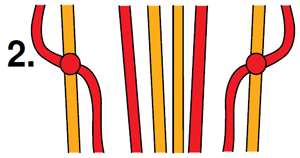
Step 1

Start with the leftmost and rightmost strings and make forward knots (and backward knots, respectively) towards the middle as the picture above shows.
Step 2
If you've done it right, it will look about like this.
Step 3
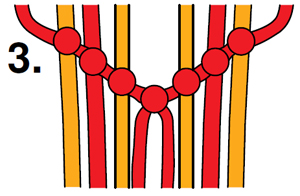
Continue to make knots towards the middle, using the same pair of strings. When they meet in the middle, make either a forward- or backward knot, it doesn't matter.
Step 4

Repeat steps 1 to 4 until the bracelet is long enough.
Alternative tutorial by kallum
Bracelet: Chevron.
Difficulty: Easy.
Looks good with: An even number of strings (6 is best for a first time).
What you need: 6+ strings, 2 strings of each color.
Strings should be: 2-3 feet. (24-36 in.)
This tutorial will teach with: Red, yellow, and blue.
You need to know how to do: Forward Knots (f/k) and Backward Knots (b/k) REMEMBER: TIE DOUBLE KNOTS!
It helps that you know how to make the: Diagonal/Candy Stripe, the Chevron on this website.
Other Info: The hardest part is tying the strings together in the middle. If you need help, please send me a private message to user "monkshood". Don't hesitate! Just ask!
Step 1. Order of string should be: Red, yellow, blue, blue, yellow, red.
Step 2. Take the red string on the LEFT and tie a f/k onto the yellow string. Then tie another f/k onto the first blue string. That red should now be one of the middle strings.
Step 3. Take the red string on the RIGHT and tie a b/k onto the yellow string on the right. Then tie another b/k onto the blue string in the middle. Now BOTH red string should be side-by-side in the middle.
Step 4. Tie the red strings together, using ANY kind of knot. After the first few "arrows" they will automatically start to slant, making an arrow like appearance. Repeat these steps with yellow and blue until the bracelet is as long as you like. Start using more strings as you progress. If you have any questions or trouble, send me a private message to user "monkshood". Feel free to request any tutorials. I'll be glad to help you! Please rate & comment! Thank you! Please see the below link for pictures of my Chevron's!
http://friendshipbraceletideas.blogspot.com/p/chevron.html
Another alternative tutorial by experthi5r
Here's how to make the Chevron/Arrowhead bracelet!!!!
YOU WILL NEED: 8 strings, 4 colors, 2 strings for each color
CODE: Black (1) Yellow (2) Red (3) White (4) (You don't need to have the same colors as I do, but it'll be easier for you if you're a beginner)
Set up like this:
1 2 3 4 4 3 2 1
Using the four strings on the left, use 1 to tie two overhand knots on 2. After that, the knot should have made strings 1 & 2 switch places. Now tie 1 onto 3 twice, like you did earlier with 1 & 2. Now do the same with 4.
Now 1 should have made a line of three knots, making it look like this:
2 3 4 1 4 3 2 1
Do the same with the 4 strings on the right, tying 1 onto 2, 3, and 4 twice.
Then it should look like this:
2 3 4 1 1 4 3 2
Then tie the 1's in the middle together twice.
Repeat the instructions, but use 2 in place of 1, so you would tie 2 onto 3, 4, and 1 twice.
Videos
The video below shows how to make a chevron bracelet using 8 strings, followed by a 10 string instruction video.
Traditional 8 string chevron
Editors
The original author of this tutorial is Stefan but it was also edited by Sareana, Jeckle, Foz, RockePloeger, Kestrel, Twinkles, Alicat, mysterytour, piggyfan2, moonaaxo and kleinevos.
Uploaded photos (see all 101)
Comments